How to Set Up SuperRack SoundGrid with DiGiCo Quantum 7
Follow these instructions to connect DiGiCo Quantum 7 engines to SuperRack SoundGrid and SoundGrid server/s for audio processing, remote control and mirroring for dual engines with or without server redundancy.
DiGiCo Quantum 7 digital mixing consoles have a different back panel layout, and different ports and connection requirements for SoundGrid networks than the standard SD7 console.
All connections should be done with compatible Ethernet cables at supported lengths.
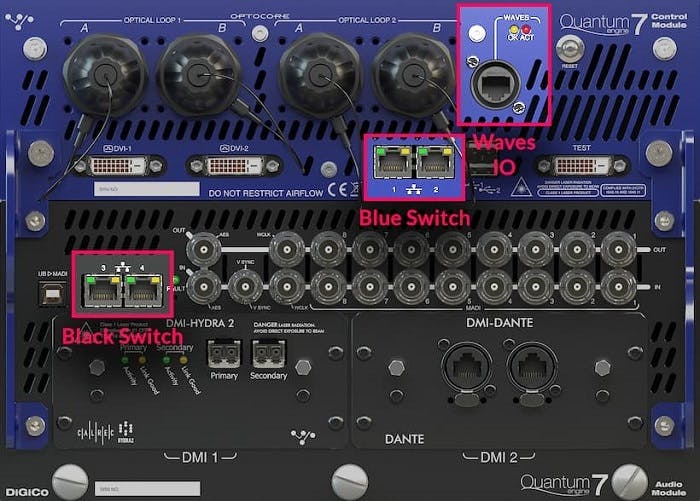
Let’s take a look at the back panel of one Quantum 7 engine. We can see a Waves IO network port and two network switches:
A pair of network ports in the top blue panel marked 1 & 2 – we’ll call this the “Blue Switch.”
A pair of network ports in the bottom black panel marked 3 & 4 – we’ll call this the “Black Switch.”
Connecting a single Quantum 7 engine to SuperRack SoundGrid and one server
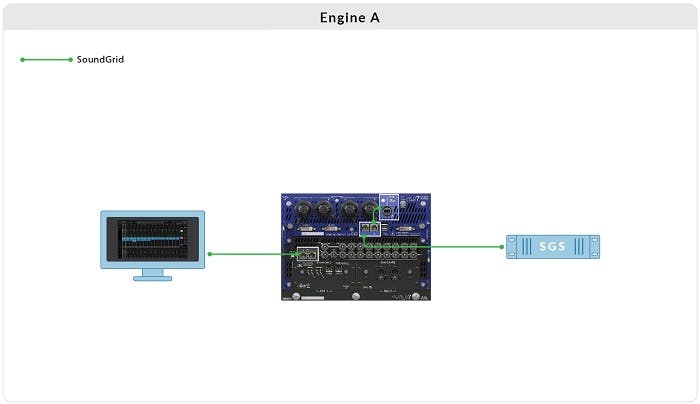
Set up a single Quantum 7 engine with SuperRack SoundGrid and one server:
- Connect the following to the Blue Switch:
- Waves IO
- SoundGrid Server
- Connect the host computer running SuperRack SoundGrid to the Black Switch.
Important: The Waves IO and SoundGrid Server must be connected to the same switch. Connecting them to different switches may result in audio drops.
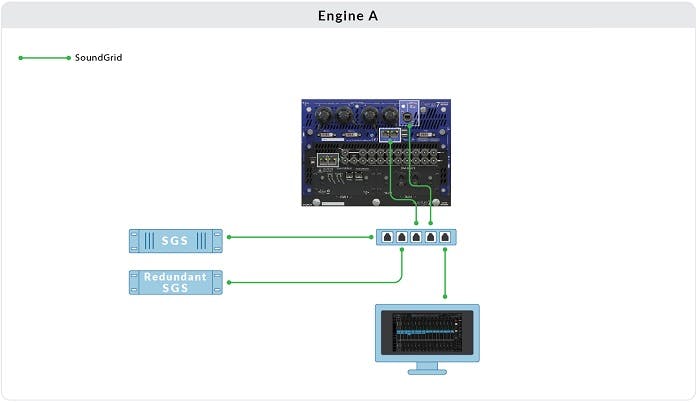
Connecting a single Quantum 7 engine to SuperRack SoundGrid and two redundant servers
Set up a single Quantum 7 engine with MultiRack SoundGrid and two redundant servers:
- Connect the following to an external SoundGrid supported network Switch.
- Waves IO
- SoundGrid Server #1
- SoundGrid Server #2 for redundancy
- The “Blue Switch” (connect to the external switch)
- The host computer running SuperRack SoundGrid.
Important:
- The Waves IO and SoundGrid server must be connected to the same switch. Connecting them to different switches may result in audio drops.
- We highly recommend that both servers be of the same model and generation.
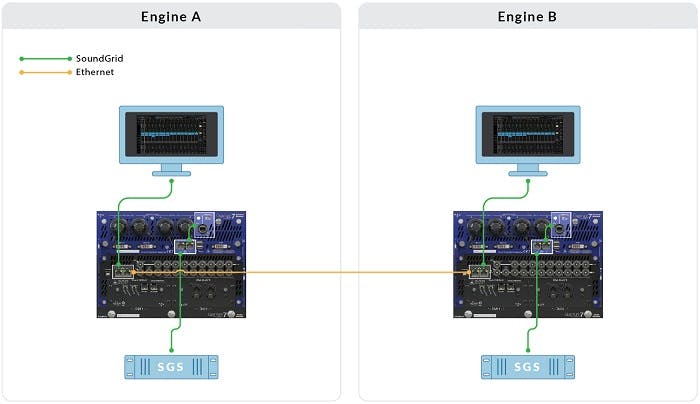
Connecting dual Quantum 7 engines to SuperRack SoundGrid and one server per engine
Set up dual (mirrored) Quantum 7 engines with two SuperRack SoundGrid setups, each with one server.
- Mark all your hardware and cables! Associate each server to Engine A or B.
- Connect the following to Engine A’s Blue Switch:
- Engine A Waves IO
- SoundGrid server A
- Connect the host computer running SuperRack SoundGrid to Engine A’s Black Switch.
- Connect the following to Engine B’s Blue Switch:
- Engine B Waves IO
- SoundGrid server B
- Connect the host computer running SuperRack SoundGrid to Engine B’s Black Switch.
- Set up SuperRack SoundGrid inventory and connections as described in the Set up SuperRack here.
- Connect a compatible ethernet cable between Black Switch A and B.
Important: Each engine’s Waves IO and SoundGrid server must be connected to the same switch, per engine. Connecting them to different switches may result in audio drops
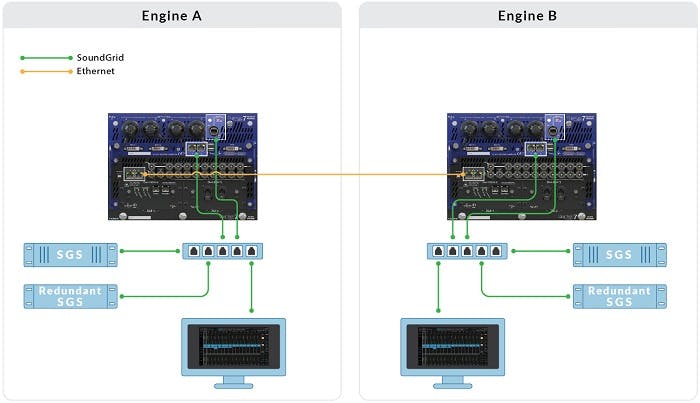
Connecting dual Quantum 7 engines to SuperRack SoundGrid and two servers per engine
Set up dual (mirrored) Quantum 7 engines with two SuperRack SoundGrid setups, each with two redundant servers:
- Mark all your hardware and cables! Associate switches and servers with Engines A or B.
- Connect the following to external supported network Switch A:
- Engine A Waves IO
- SoundGrid Server #1
- SoundGris Server #2 for redundancy
- Engine A’s Blue Switch (connect to external switch A)
- SuperRack SoundGrid Host Computer A
- Connect the following external supported Switch B:
- Engine B Waves IO
- SoundGrid Server #3
- SoundGrid Server #4 for redundancy
- Engine B’s Blue Switch (connect to external switch B)
- SuperRack SoundGrid Host Computer B
- Connect the host computer running SuperRack SoundGrid to Engine B’s Black Switch.
- Setup SuperRack SoundGrid inventory and connections as described in the Set up SuperRack section here.
- Connect a compatible ethernet cable between Black Switch A and B.
- Setup Engine and SuperRack mirroring.
Important: The Waves IO and SoundGrid servers must be connected to the same switch, per engine. Connecting them to different switches may result in audio drops.
We highly recommend that both servers be of the same model and generation.
Setup Engine and SuperRack Mirroring:
Each engine now has its own complete, synchronized SuperRack system as set up above. They are separate systems, but communicate via the SoundGrid network.
The instructions below assume that you properly configured network communication between the two consoles/engines about to be mirrored.
Important note: Mirroring is supported only when both host computers run the same OS version, the same version of SuperRack, and the same version of Waves plugins. For example: two computers, each running Windows 10, SuperRack V12, and V13 Waves plugins; or two computers, each running macOS 10.15, SuperRack V12, and V12 Waves plugins.
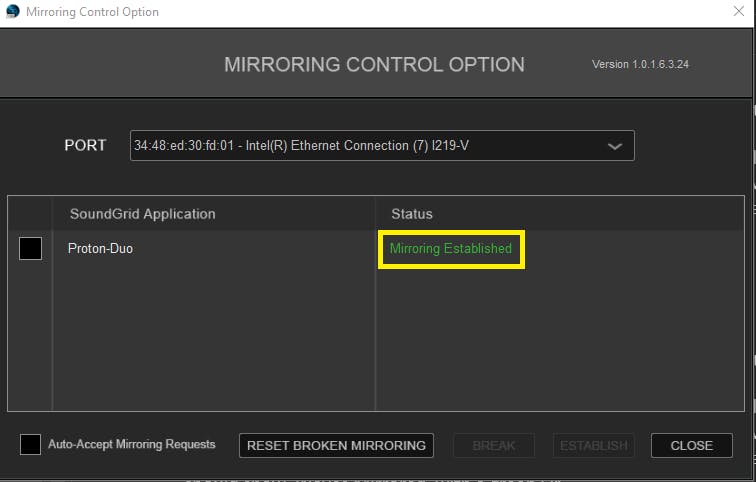
- In the SuperRack Setup tab under Controllers, assign the Mirror Control module on both computers.
- Click on the gear wheel to open the panel.
- Under Port, select the same port as the SoundGrid network.
- On DiGiCo engine A, go to Network and click "send session to selected" – the session will now be transferred to engine & SuperRack B.

- Once both SuperRack B and engine B have received the session, click 'Mirror to selected'.
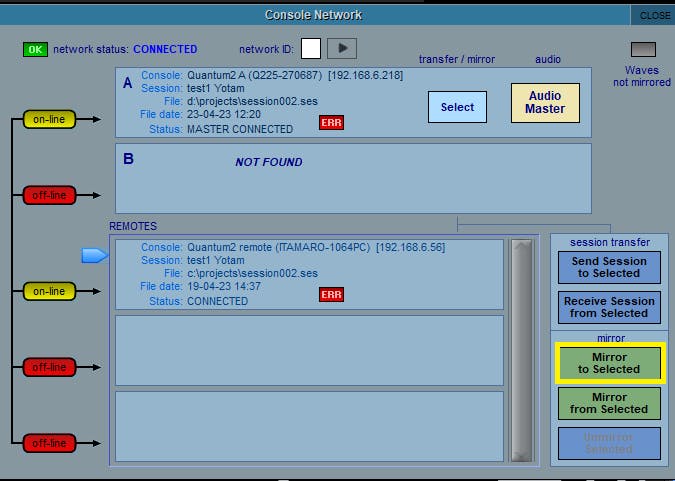
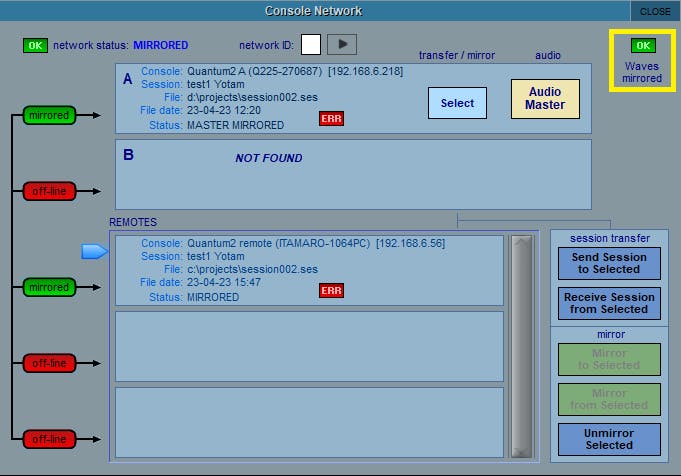
- When done, both Mirror Control modules in SuperRack A & B should read: "Mirroring Established" and the console's network window should show 'Waves Mirrored' with a green OK.